How to get started with the Gettysburg College CMS (Content Management System).
Send questions about the website or the CMS through our online Web Request Form:
On this page:
Basic CMS training video

Advanced CMS training video
Topics in this video
Accessing CMS
-
Supervisors should send a request to webmaster@gettysburg.edu so that employee can be signed up for the next CMS training. Please include the office or department you work in.
-
To gain access to CMS, an employee must attend CMS training and complete the CMS evaluation.
-
At the end of CMS training, an evaluation of short answer questions will be administered. The evaluation will be self-graded and is meant to be a learning tool. Our goal is for everyone to pass.
The evaluation is available here: https://forms.gle/vUYp1ZriQdJXAGb18
Creating a new page
Watch creating a new page video
-
Login to the CMS at https://www.gettysburg.edu/dotAdmin/
-
Click the button on the right hand side of the screen titled “site.” Once the “site” button expands it will reveal a “browse” button beneath. Click the “browse” button.
-
Navigate to the folder in the folder structure that you would like to create a page inside of.
-
Inside of the folder click the orange circular button in the upper right hand corner. The button will reveal a list of options. Select “page.”
-
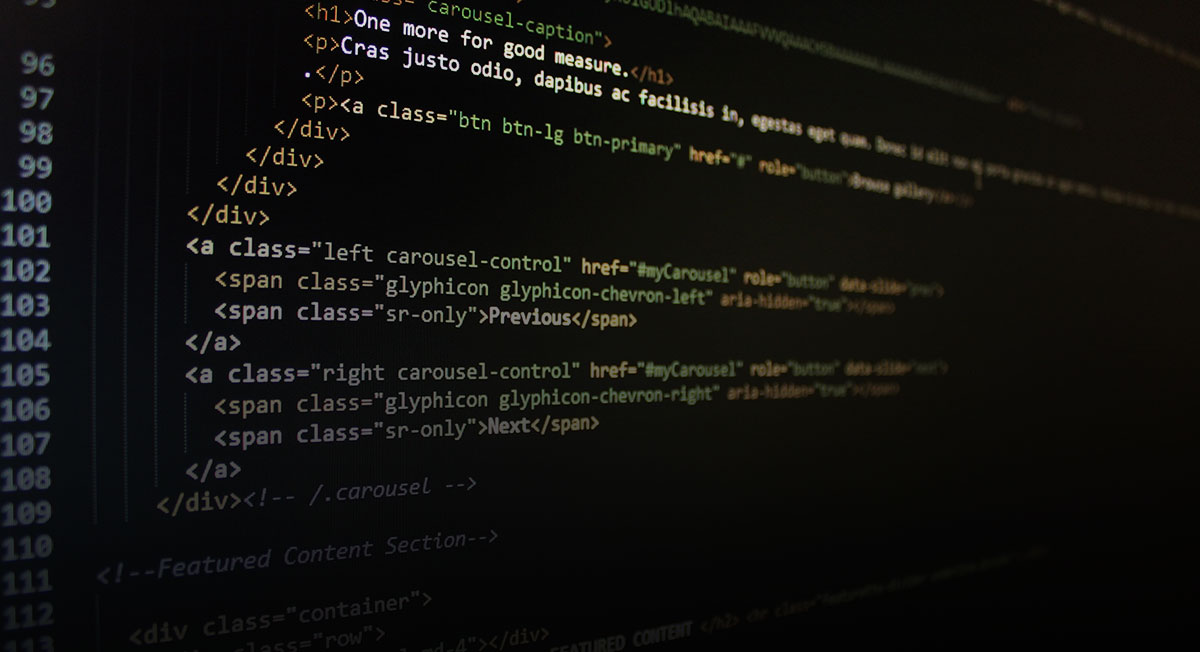
A dialogue box will appear that asks you what page asset type you would prefer to use. Select
0 Gettysburg Page Asset -
In the Title field enter the name of the page. This will autopopulate the URL path name with the same language separated by dashes. Please avoid using dates in the URL path name. Please do not use numbers such as 1, 2, 3, etc. to give your URLs unique names either.
-
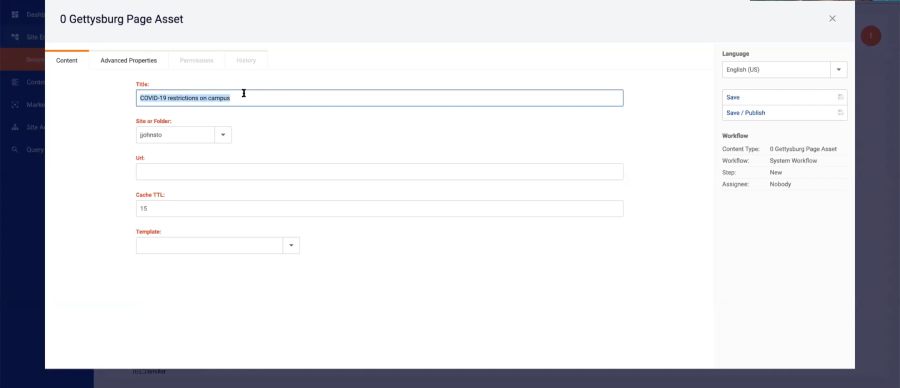
In the “Site or Folder” field please navigate to the folder where you would like your page to be created and select it.
-
Please select a template from the drop down menu.
-
Click Save and Publish on the menu located on the right hand side.
-
Your page will open and you will be able to start adding content to your page.
-
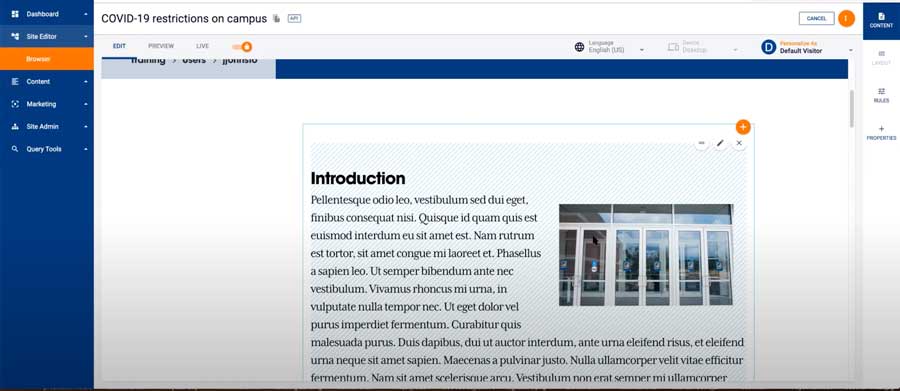
In the upper right hand side of the screen click “edit.” This will lock the page for editing automatically and the lock symbol will turn orange.
-
Scroll down the page and you will see two blue boxes with circular orange icons that have plus symbols on them in the upper right hand corner of the boxes. Click the orange icon and select “content” from the menu.
-
A window will appear that gives you the option to search for a piece of content by its name. You can search for content if the content that you are placing on the page already exists. If the content does not exist and you need to create a new piece of content click the orange button with a plus symbol in the upper right hand corner of the window and select
0 Gettysburg Content (Generic). Once you complete those steps you can now create a new piece of content for your web page.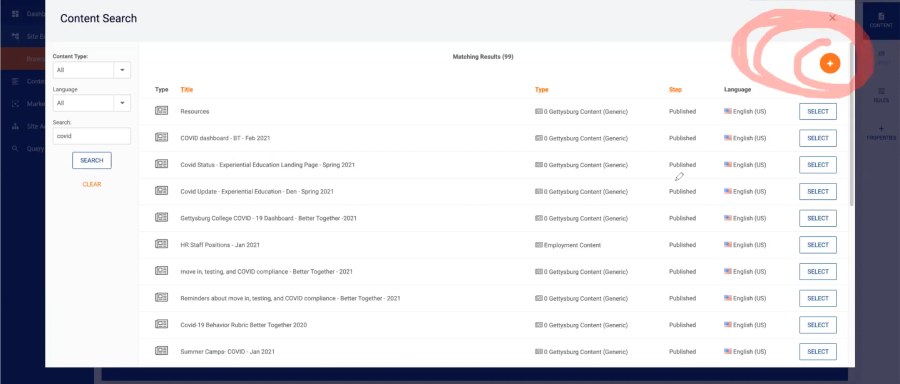
-
If your edits are time sensitive, please contact webmaster@gettysburg.edu once you have sent your content for review.
Editing content
-
Login to the CMS at https://www.gettysburg.edu/dotAdmin/
-
Navigate to the page you would like to edit. Double click on the page.
-
In the upper right hand side of the screen click “edit”. This will lock the page for editing automatically and the lock symbol will turn orange.
-
Hover your mouse over the block of content that you wish to edit. On hover you will see three white symbols appear in the upper right hand corner of the block of content. These three symbols are two horizontal lines, a pencil symbol, and an X symbol. Click the pencil symbol in order to edit the content.
-
Update the title of the content to include the department/office name, a brief description of the page, and the month/year that the content is being edited. For example:
[content label] - [department] - [Month YYYY]CMS training - CM - April 2020Alumni - Classics - March 2020Staff navigation - Library - December 2019
-
Make sure the Host field is updated. You can do this by clicking the dropdown and navigating through to the folder where your content is currently stored.
This needs to be a folder you have permissions to - if it is not, you will receive an error message when you try to save the content.
The default is www.gettysburg.edu- this needs to be changed.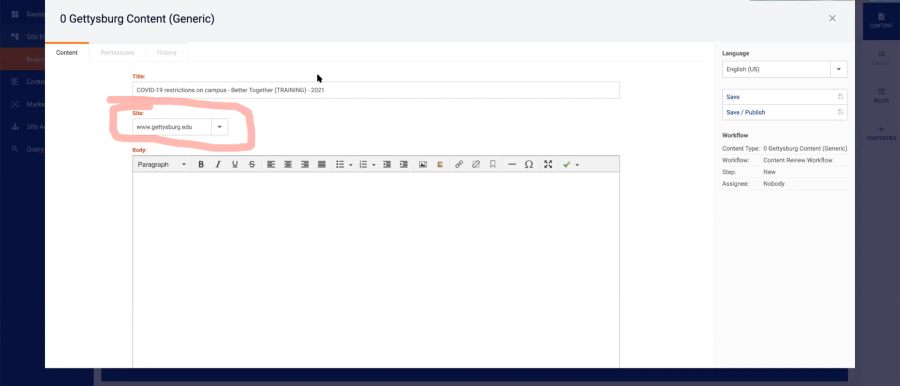
-
Make the desired changed to the body of your content.
Note: This can be done through WYSIWIG view (with options displayed at the top similar to Microsoft Word), Code view (with code appearing in colors) or
Plain view (just the code). Note that your closing tags will autopopulate if you make changes in Code view.These options are located at the lower left hand corner of the body section. -
Click the “Save” button on the right side of the screen to save your changes.
-
To publish your changes, you need to open the content again, and select “Send for Review”
The content will then be reviewed by someone in the Communications and Marketing office and either be published as is, edited and published, or we may content you if there are any other issues. -
If your edits are time sensitive, please contact webmaster@gettysburg.edu once you have sent your content for review.
Working with hyperlinks
Watch working with hyperlinks video
-
Open the content you wish to edit. Highlight the text you want to link. Note that the text should be descriptive of where the link will take the user. Do not use general terms like click here or read more. More information on creating link text: https://www.nngroup.com/articles/better-link-labels/
-
Click on the link icon on the top menu of the WYSIWYG
-
You now have two options:
-
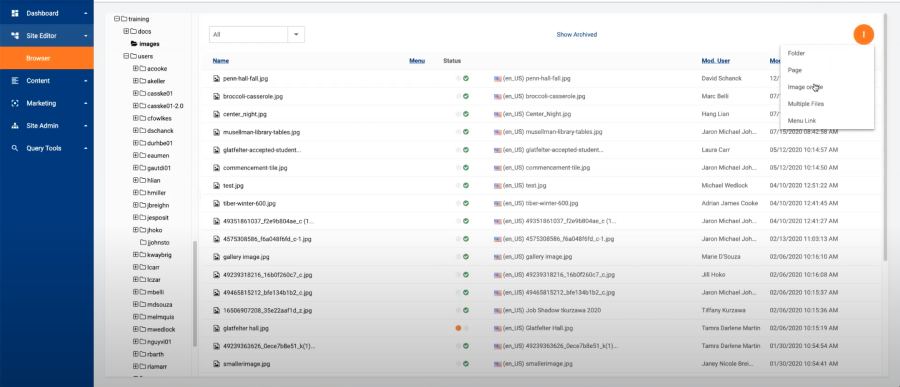
Option 1: For internal links, you can browse for the page you want to link within the site tree of CMS
-
Click on the icon indicated in the screenshot below to open up the site browser tree
-
Browse on the left hand side through the folders to where the page you want to link is stored
-
Select the page you want to link from the middle/right hand side of the screen
-
Select “Save / Publish” on the right hand side on the screen. Your page is now linked.
-
- Option 2: For external links, or if you know the internal link, you can paste the link within the window that opens.
-
Paste the external or internal link within the URL field of the window that opens.
-
For internal links, you can leave off
https://www.gettysburg.eduand include all that follows, for example:/about/offices/ees/adding_a_hyperlink -
For external links, enter the full URL:
https://www.example.com/. Select “Save / Publish” on the right hand side of the screen. Your page is now linked.
-
-
Inserting images
See the section on Uploading assets to add images to the CMS so that they are available to add to your pages.
-
Resize and upload your image to the appropriate folder (each office and department has an images folder - in the folder, you will find a folder labeled by year).
-
Open or create the content that you wish to edit.
-
Place your cursor where you want the image to be.
-
Select Insert from the WYSIWYG menu and click on “Insert Image”
-
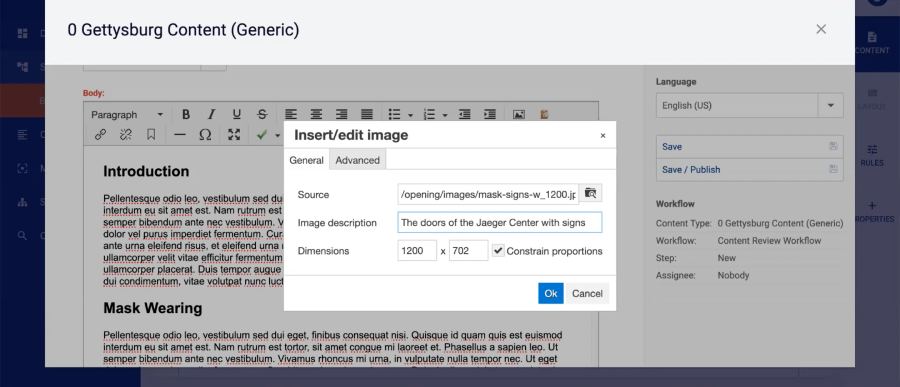
Click the browse button to the right of the source field.
-
Locate your image and select it.
-
Update the image selection field with text that accurately describes the image.
-
Use the advanced to add styles, horizontal, and vertical space. Do not add borders.
-
Select OK
-
Make the image responsive:
-
Switch to Code view mode in the WYSIWYG.
-
Locate the code for your image, it will look like this:
<img src="/about/images/2012/13.jpg" alt="Image Description" width="729" height="900" /> -
Remove the width and height attributes.
-
Add the width, float, and margin as part of the style.
<img src="/about/images/2012/13.jpg"
	alt="Image Description"
	style="width:40%; float:right; margin:1em;" />
This aligns the image to the right, makes the image 40% the width of its container and creates a 1 em margin around the entire image. Read more about the use of percentages and ems in web design.
-
Linking to PDFs
See the section on Uploading assets to add PDFs to the CMS so that they are available to link from your pages.
-
Open or create the content that you wish to edit.
-
Highlight the text you wish to link. Make sure it is an accurate reflection of the PDF you are linking to.
-
Select insert from the WYSIWYG menu and click on “Insert Link”
-
Click the browse button to the right of the URL field.
-
Locate your PDF and select it.
-
Update the title field with text that accurately describes the PDF.
-
Select OK
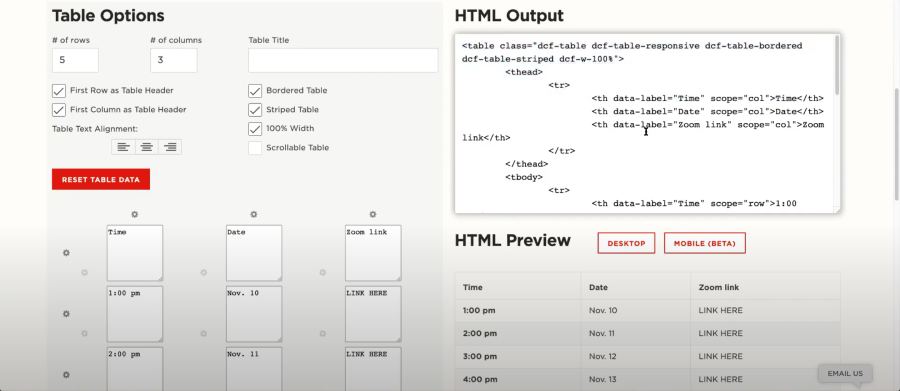
Working with tables
Watch working with tables video
Tables can be copied to the visual (WYSIWYG) editor either from a correctly structured Word document or from UNL’s Responsive Table Generator, or they can be created by hand in the code editor.
Uploading assets
Uploading images
-
Resize your image so that it is the maximum size that it will display, typically no wider than 800px.
-
Do not upload full size images. Use one of several online image editors if you do not have a program on your computer. Photopea functions similarly to Photoshop. Get started with a Photopea tutorial.
-
Navigate to the images folder in your main folder and then to the current year folder in that folder.
-
Right click on the folder to reveal the menu.
-
Select new “Image or File”
-
When the pop-up window loads, make sure it says 0 - Gettysburg File Asset and then click on “select” - this should be the default.
-
When the next screen loads, click on the “Browse” button and find your image on your computer.
-
The Title and File Name fields should fill automatically.
-
Click on “Save/Publish’ in the right column.
-
To return to the folder view, click on “browser” in the left navigation.
Editing navigation
Adding a folder to the left navigation menu
-
Locate the folder in CMS.
-
Right-click on the folder, select “Edit folder”
-
Select “Show on menu.” Add a Sort Order number. The sort order determines where on the menu the folder will appear, with 0 being first.
-
Click Save.
Adding a page to the left navigation menu
-
Locate the page in CMS.
-
Right-click on the page, select “Page Properties”
-
Select “Lock for Editing” on the right side of the screen.
-
Go to the “Advance Properties” tab.
-
Select the “Show on Menu” checkbox. Add a Menu Sort Order number (i.e. the menu sort order determines where the page will appear on the left hand navigation, with 0 being the first listed). Make sure you look to see what other pages are already on the left hand navigation menu and what they are numbered.
-
Click “Save/Publish” on the right side of the screen.
Publishing content
Submitting content for review
Follow these steps to submit content for review in DotCMS:
- When you are finished making edits to your content in WYSIWYG or CODE view click the “save” button in the upper right hand corner of the screen.
- Once the content is saved click the “cancel” button beneath the save button in the same menu of options.
- Once you click the cancel button you will be taken back to the fully rendered web page. Click “lock for editing” and then click the “edit content” button on the page to open up the content for editing again.
- Now that you have the content open you should see the “send for review” button in the upper right hand corner of the screen. Click the “send for review” button to submit your edits for review.
Sharing unpublished content
Once you have created content in DotCMS you may want to share that content with another user without submitting the content for review and publishing the content. Please use this method to share unpublished content in DotCMS:
- Download and install Firefox if you do not already have it: https://www.mozilla.org/en-US/firefox/.
- Open Firefox and sign into DotCMS. Open the page that you intend to share.
- Right click on the web page and select This Frame > Open Frame in New Tab.
- In the URL Address Bar you should see a Grey icon that has three dots. Click the grey icon and select “Take a Screenshot.”
- Click and drag to select the entire page within the white box.
- Click “Download.”
The end result should be a screenshot that looks like this: